Saturday, 15 March 2014

LV. Homo troglodytes

As I promised, I'll put down a few words about the background of the Troglodytes. 

I. HOMO TROGLODYTES


I first mentioned these creatures in August last year, in the same post where I introduced the Bell-ringers of Hades.  At the time I briefly described them as following:
"Stray branch of humankind. Deformed inbred creeps who normally live deep in subterranean caves and have no dealings with the world above the ground. However, for some reason they have now emerged from the darkness and started attacking their Homo sapiens relatives. Their leader is the huge levitating Mother, the one they all descended from."
Basically, my Troglodytes are a species that belongs to the same genus of hominids us humans do, and that inhabits subterranean caves. They manufacture and use tools and weapons of stone and bone, but they don't possess the technology of metalworking. Because of this, metal objects from the world above are considered a luxurious treasure. In their cave complexes, Troglodyte workers farm fungi for food and keep herds of blind beasts that inhabit the underground as their cattle. Up until recently they could rarely be seen above ground, and when they did come out it was generally at night. But now something is making them emerge.

Troglodyte Workers.

On the tabletop, a large number of common workers will make the bulk of the Troglodyte crew.  Cheap and not particularly strong, but numerous, they will be led by one or two stronger magic-user characters to help them out.

When designing this faction I had in mind several themes, the most prominent being the idea of another species of human surviving alonside us. That is something I like to ponder on, as it is intriguing and in a way unsettling. It raises so many questions. For example, if we discovered another species from our genus today, how would we treat them? We probably wouldn't just leave them be and not interfere, since that's not in our nature. Would we give them the same rights we give ourselves, or would they be seen as animals? How would they see us? What would their culture be like? How about their language? If I believed in the existence of an immortal soul I would also have to ask myself whether those newly discovered relatives of ours had one? I'm sure they would be a subject of much debate. It's just as fascinating to me as the idea of a human-ape hybrid; though much less morally outrageous. Or how about imagining the future and the way we might evolve further (think H.G. Wells' Time Machine)? 
Anyway... Besides the "other human" theme, there's ants. Just like those tiny insects, Homo troglodytes live in colonies under ground, and at the head of a colony stands a queen (called the Mother). She is crucial for the survival of her colony, as she is the only female - only she can make more Troglodyte workers. Unlike with ants though, there are no drones. The workers are all male and very much fertile; as a result, to every Troglodyte his grandfather will at the same time be his brother. The very limited gene pool might be the explanation for their physical deformities. I might at some point add a warrior caste to give them more variety and hitting power.  

II. THE MOTHER


The ruler of each Troglodyte colony is the Mother, a hulking, obese creature which regularly mates with workers and spawns fresh Troglodytes. She is worshipped as a living godess. A Mother is too heavy to move on her own, and possesses neither eyes nor ears; just a mouth to feed through. However, she has telepathic and telekinetic abilities. This enables her to perceive her environment through senses of her subjects surrounding her, and when the need arizes for her to move she does it by levitating. She also communicates telepathically, but only with the chosen few individuals- the Shamans. 

I intend to sculpt the model from scratch, with Venus of Willendorf as reference material. That will make an interesting little sculpting project.

III. THE SHAMANS


The Shamans are Troglodytes gifted for the spiritual and use of magic. It is through them that the Mother speaks, and they are figures of authority among their kind. They are able to conjure fire and travel to Spirit worlds, and in addition to that it appears they have the ability to resurrect their dead.

You've seen the first shaman last week, and now I'm working on another one:

Front.

Back.
  
The model I started from. Picture from Games Workshop website.

I wanted the two Shamans to sport a very similar look. I equipped them with the same items and details: a staff, preserved heads, metal rings, mushrooms, fishbone. For this second shaman I had to sculpt my own fish remains. Here is how I did it:


I. I took a little ball of green stuff and flattened it on a hard surface, vaguely in the shape of a fish.
II. I defined the outline better and marked the basic shapes with my hobby knife and sculpting tool.
III. Added the details with hobby knife.
IV. Given some more attention to the details and tidied up. Once it cures I'll get it off the wooden board and glue it on the Shaman. 


It's quite simple when you break it down to steps and go from rough to particular. : )

The Shamans were inspired partly by Fallen Shamans from Diablo II game: they attack by throwing fireballs and resurrect dead Fallen. The other important influence were Boggarts from Magic: The Gathering card game's Lorwyn cycle. These also liked to play with fire, and their mechanic in the game relied a lot on returning dead Boggarts back to play from the Graveyard. The appearance of my Troglodyte Shamans was inspired heavily by these two card illustrations (the one in the right actually being a Lorwyn Boggart):


  In my next post I will discuss my plans for the rules.

*   *   *

AGRAM ARENA SUMMER TOURNAMENT 2014


The official announcement for this year's Agram Arena Summer Tournament is up:

Dear friends,

It is time for another (12th annual) Agram Arena Summer Tournament!

We are in the second decade of organizing Arena events and this year's Agram Arena Summer is going to be held over two weekends:

12-13th of July 2014 - 40K International tournament + Black Queen International hobby and miniature painting competition

19-20th of July 2014 -Malifaux International tournament + Demo Games / Open play (Infinity and LOTR SBG on Saturday 19th; Flames of War and Warmachine on Sunday 20th)

Location: MS "Cvjetni trg", Miskecov prolaz 3, Zagreb, Croatia.

Entry: FREE!

Refreshing drinks for all players will be free during the tournaments.
Accommodation for Saturday night is also free for the 1st-time-comers (read more in the rules)!
Lunch is available at the price of 75 Kn (around 10 Euro) for both days (= 5 Euro/day)!

Check out the tournament rules & other info:

Combo rules (40K, BQ & Malifaux)
with background: http://www.ums-agram.hr/app/webroot/dokumenti/AAS2014.pdf

w/o background (printer friendly): http://www.ums-agram.hr/app/webroot/dokumenti/aas2014pf.pdf

Official languages of the tournament will be English and Croatian!

Registration:
40K - from 1st of June to 05th of July
Black Queen - from 18th of June to 05th of July (not neccessary - see the rulespack)
Malifaux - from 1st of June to 14th of July
Demo Games / Open Play - from 14th of July to 18th of July
(you can find guidelines on registration in the rules (check out the above link))!

If you need any other information please contact us at ums.agram@gmail.com or GSM +385 91 7620584

Welcome!

Saturday, 8 March 2014

LIV. The Troglodyte Shaman

This has been quite a hectic week, with me rushing to meet several deadlines, the new semester beginning and whatnot. But I managed to scrape together some time to do a bit of hobby work (mostly late at night). I made a Shaman for my Troglodyte faction.


I went through my box of unpainted plastic goblins and picked one with a suitable pose. After removing his weapon I replaced it with a staff (made of brass rod and a little bit of green stuff to make the ends look more natural). I decorated it with a couple of heads from the Plaguebearer kit, and to the top of the staff I tied a metal ring using a length of very thin wire.The bones around his neck come from Empire State Troops.


 He definitely needed some more detail to make him stand out as a hero. Mushrooms seemed like something a shaman might carry around, so I put them on his belt. These are pins, cut to length and covered in a few layers of white glue. The glue makes the shapes less sharp and more organic. I got the glue idea from the way Don Hans makes his wonderful chaotic scenery, as explained in his blog. 
Another detail I added was a little fish skeleton. I found this in my bits box; it's metal and I'm pretty sure it came off one of my old metal River Trolls. This should be fairly simple to sculpt from scratch, though. I'll do just that for my next Shaman (there will be another one shortly). And the final bit I put on his belt was another metal ring. These guys like to collect metal objects, since that's something they don't see every day where they come from. I'll explain more of their backstory and inspiration for them soon enough. 


Along with the Shaman, two more regular Troglodytes joined the crowd. The crew is coming along nicely.

*   *   *

It's March 8th, so happy International Women's Day to all the ladies among my readers!

Today is also the final day of UMS "Agram"'s annual exhibition I announced here a couple of weeks ago. For all those of you who didn't have a chance to go see it I have some pictures: 

This is the building where the gallery is situated.
A cabinet dedicated entirely to Malifaux.

Most games played in the Club are represented. For example, these two glass cabinets hold some Mordheim, LoTR, Warhammer Fantasy Battles, Warhammer 40K and Bloodbowl.

Gardens of Hecate has a whole shelf to itself. I'm hoping that next year I'll have twice as much stuff to put here.
Bell-ringers haunting a graveyard. But the Doctor's undead hounds seem to have picked up their scent.
The Countess and her Spirit entourage emerging from a forest.

Tuesday, 25 February 2014

LIII. The Faerie Sniper

Over at Wamp forum, a painting competition sponsored by Studio McVey has been announced a couple of weeks ago. Having actually bought one of their miniatures recently, I decided to enter the competition. Even if I hadn't already had the miniature, I would have used this chance to get one: the McVey store offers a 20% discount for anyone buying a mini for the contest. To get the discount just enter the code SMWAMP while buying at studiomcvey.com.


The miniature I painted was the lovely Ar-Fiach, from their limited edition resin range. It's a beautiful sculpt, and the resin miniature is tiny and delicate. I wanted it to be usable for my games- and to fit into the Gardens setting it needed some conversion. A TV aerial it holds on to and the too modern-looking chimney had to go. It's a pity in a way, because those bits really make it much more interesting. It is not often that you see a faerie depicted in an urban setting. Ah well... I might get another one some day.


The hand holding the aerial was replaced by one of the Hobbit Goblin hands. Something a tad smaller would have been perfect, but this was the best I had. The clawed hand reminds me a bit of bird talons, which is cool because Ar-Fiach sports a number of birdlike features to begin with: look at her legs from knees down, for example, and her hair is actually all feathers. I posed the hand as if she were saying to the observer: "Shhh. Don't scare away my prey." Quickly after the moment captured someone or something is going to get shot.


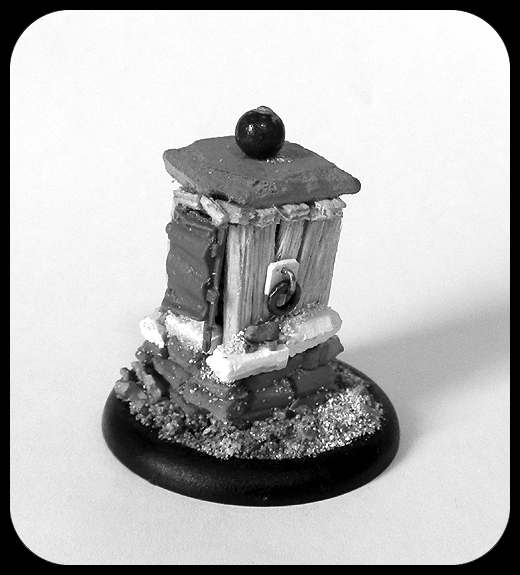
I also needed a replacement for the chimney. The most obvious option was to just build a more fantasy-looking chimney. However, I wanted her to stand much closer to the ground. It would have been cool if I could have put her on a small tree or a log. But the sculpt requires a very specific shape to stand on. After an afternoon of attempting to build some sort of small structure to fill the role, I ended up with this "hitching post + announcement board" thingy.


The base, completely built. This is a 40mm base, by the way.
 The structure was built around a cork. The individial stones were cut from some leftover plaster and clay wall parts from another project, and then glued around the cork with PVA glue. I meant to make the entire structure in stone, but I gave up half way up because the process of making the stone bricks was really annoying me. So I just went with balsa wood planks from there on. However, I put a big, flat square stone on the top in the end. The board with the paper nailed to it comes from the Citadel Wood kit. 
The metal rings on the sides look really nice and are fairly simple to make. You can get the little rings in hobby shops that sell jewellry-making materials. Then you simply cut a little square of plasticard and drill two holes in it. Attach the ring to it with a twice bent piece of paperclip or pin, and then glue the whole thing wherever you need it. This is also great for door knockers.

The painting on the base done.
 After adding some small stones and sand to to finish it off, I undercoated it grey and proceeded to the painting stage. Pale stone parts contrast the dark wood. I used pigments applied as a wash with water to add some colour to the grey dirt. The rusty effect on the metal rings was acheved by painting them first with a light reddish brown, followed by a bit darker brown pigment. It would have been better if I had a proper rust-coloured pigment; but alas, I don't.

The finished base.

The final step was adding some foliage. Grass tufts, a couple of those tiny dry "leaves" I put on everything, and some moss patches on the stone bits. I actually darkened the grass a bit with a brown wash, and then lightly drybrushed the tips for contrast.  
Oh, and the text on the message board was added in the meanwhile. It's just wavy lines, nothing intelligible.

Ready for painting.

After that I started work on the miniature itself. I'm afraid I don't have any pictures of the painting process... The colour scheme was, as usual, pretty dark. I think that suits a faerie well, after all they are terrifying, morbid creatures. Those pretty blue and black striped feathers in her "hair" were inspired by jay feathers I usually wear on my hat. I think their vibrancy livens up the whole grim picture quite nicely.

Pretty little feathers...
I haven't yet got a background story for this character, but a new faction is vaguely forming in my mind already. We'll see later what comes of it. : ) 
And as for the results of the McVey competition: the deadline is a whole month away, and after that who knows how long before the results come in. I'll have to be patient. I'm really looking forward to seeing the other entries.

Friday, 21 February 2014

LII. Troglodyte Fun

The frist couple of Troglodytes can be called done. The paintjob was inspired by Arthur Rackham's illustrations, so I used mainly washes and glazes with a little highlight in the end. And the most extreme shadows were lined in using Typhus Corrosion. Yes, Typhus Corrosion. It is perfect for the job: it's a nice dark brownish shade, it flows well but sticks exactly where you put it, it has a perfect level of opaqueness, even a little texture...  I'm so happy I discovered this. The only drawback is that it is terribly unkind to brushes, so I wouldn't recommend using it with your finest sable.


They are such great sculpts. Most of these buggers will be good out of the box, with just their metal weapons swapped with bones. I'm planning to add a shaman and some sort of a big leader type; those two will require some more extensive converting.


And another Bell-ringer. This brings their nubers up to six (if we include the Devil). His crude club still has leaves attached.


 *   *   *

If you happen to be in Zagreb between February 27th and March 9th, you'll have a chance to see my miniatures in person. My club UMS "Agram" is having their annual exhibition at Vladimir Horvat Gallery, Trg žrtava fašizma 14, Zagreb. Some of my terrain and crews will be displayed there, among other things. And in the evening of March 5th I'll be there demoing Malifaux. Drop by if you're in town. : )


 *   *   *

Thursday, 13 February 2014

LI. Tutorial: How to Sculpt a Ruff

In the comments section of my last post I was asked by Logan how I sculpted the ruffled collars on my miniatures. I thought the best way to explain was through an illustrated tutorial. As always, if you wish to see bigger images just click on them.

17th century portrait of a contemporary lady wearing a ruff.


HOW TO SCVLPT A RVFF


Ingredients:

I. a miniature you wish to give a ruff to (I didn't have any, so I used a brass rod instead)
II. green stuff
III. superglue

Tools:

I. a hobby knife
II. a pointy sculpting tool

As seen in Figure 1. 
Figure 1
Just a quick note: ruffs were popular from the mid-sixteenth century to the mid-seventeenth century. They were worn by both women and men, as well as children. 
 

Instructions:

I. In order for the collar to stay in place and keep its form better while I'm sculpting, I first made this small ring of green stuff around the "neck" to serve as a sort of foundation. I let it cure completely.  (Figure 2)

Figure 2
 II. Now that the collar had something to grab on to, I dabbed a tiny amount of superglue on it and covered it with a little ball of freshly prepared green stuff. Using my tools I shaped it into a cylinder.  (Figure 3)
Then I waited for about ten minutes  for the green stuff to stop being so very soft.

Figure 3
 III. The next thing I did was grab a knife and roughly define the folds on the top and the bottom of the cylinder, all around. (Figure 4)

Figure 4
 Make sure the bottom ones and the top ones don't stand in the same vertical line. Each bottom one should be right between two top ones. (Figure 5)

Figure 5
 IV. Then on the sides, between each pair of grooves I made in stage III., i poked a round hole with my sculpting tool; see figures 6 and 7. 
Figure 6

Figure 7
 I deepened the vertical grooves to connect with the holes. (Figure 8)

Figure 8
 I did this all around the cylinder. This already looks a lot like the final product. (Figure 9)

Figure 9
 V. Since all this poking significantly deformed the initial cylinder form, I used the flat side of my knife to gently press it back into shape. (Figure 10)
Figure 10
VI. As it was expected, this damaged the look of the folds a little bit. So I picked up my pointy sculpting tool again and redefined all the folds. (Figure 11)

Figure 11
VII. The general shape got deformed again, though not nearly as much as the first time. So I repeated steps V. and VI. once more. Do this as many times it takes for you to be satisfied with the look. And this, figure 12, is it:

Figure 12
*   *   *

As you can see, it's not that difficult. It just takes a lot of  going back and forth towards the end. You can use this technique to make a ruff of any size and diameter (for very big diameters you'll need a bigger underlying support, though). You can also use it to make a tutu ( useful for circus-themed conversions, for example). I like to put ruffs on the Countess' spirits.


Thank you for your attention and I hope you find the tutorial useful. If any of you readers have a more sophisticated technique for sculpting this, I would much appreciate your advice. : )

Monday, 3 February 2014

L. A Murderous Out-of-body Experience

The Countess gets another violent spirit in her crew. This time it's her own!
The Countess is able to use a spell which severs a part of her soul and releases it from her body. The soul fragment manifests as the dreadful White Harpy. The creature is an ethereal flying monstrosity, a potent ally in battle. Not that fighting is its only use; the Countess oftentimes sends the Harpy out at night, to fly over her county followed by a retinue of Night Gaunts and scan the ground below. 


I went for a similar head as for the Countess, since I wanted the Harpy to clearly resemble her. They are both plastic Daemonette heads, only the Harpy's face being more monstrous in features and expression. The body is a Bloodletter's and the wings are from Dark Eldar Scourges. I replaced the feet with Plaguebearer sword blades. 


As I built the mini I took the opportunity to try a couple of new things:
Recently I finally got a rotary tool, to make pinning less of a chore and allow for more modelling possibilities. I used this to hollow out the chest and then install a skeleton torso in it.  I thought it would be cool to have cracks around the hole, so I dabbed the area with a thick layer of Agrellan Earth. I did that around the roots of the leg-blades and on a couple of spots on the back. Later I just painted over it normally, and the texture remained. I had no idea whether this would work, and I'm happy it did in the end. :)


The colours I used were the same as on the Countess since, as I mentioned before, I wanted them to be strongly visually linked.

The Countess and her etheric projection.

I feel this is one of my most bizarre creations so far.