Showing posts with label Warcry. Show all posts

Saturday, 23 November 2019

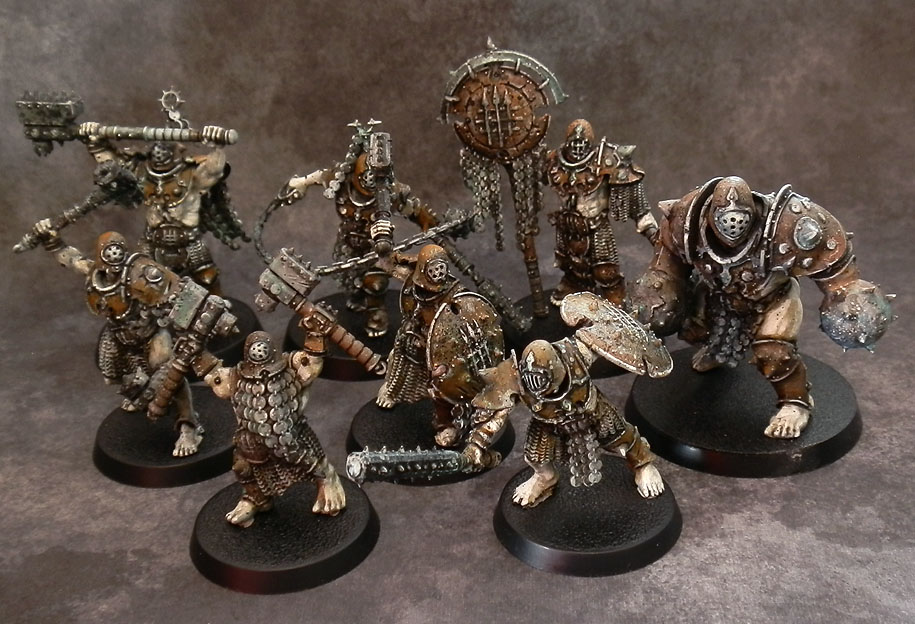
CCXLIII. The Bronze Bulls Warcry Warband

In my second take on the Iron Golems I did more conversion work, and gave them an alternative background. 

Ogor Breacher

The Bronze Bulls wear horned helmets, in honour of ther sigil. I sculpted the horns out of Magic-sculpt, which has the best properties for the task. I doesn't bend when cured, and was easily shaped, bent and installed on the helmets at different stages of curing.

Signifer

The symbol on the signum is the symbol for theZodiac sign Taurus. I sculpted it with Magic-sculpt.

Dominar

The minis were primed using my usual method of white over black spray, and then painted using very thin paint.

Drillmaster

The abundance of details that makes the models busy is toned down by not accentuating certain details of the sculpts, and by keeping them rather flat and murky.

Armator
This monotony is broken by the individual armour scales, one per model, picked out in vivid red. This is a trick used by this warband to gain advantage in combat. The tiny spot of red instinctively attracts the eye - distracting the enemy, if only for a split second. Sometimes that moment is enough.


Legionaries

Another way of confusing the foe by employing colour is through one of the Legionary models. In contrast to the other warband members, her armour is painted red. It screams for attention, potentially making the foe focus on the lowly Legionary while the more powerful warriors use that confusion to their advantage. These Red Legionaries are highly regarded by their peers for their valour, as they tend to have a high mortality rate.


The Bronze Bulls' gimmicky use of red was inspired by this bracelet designed to protect against the evil eye, which I found in a book about folk medicine:


 *   *   *

In other news, I bought a model from the amazing @ingrimmson. It was love at first sight and I simply had to add it to my collection. Luckily, he agreed to part with it. The plan is to paint it and use it in my AoS28 games. :)


Sunday, 15 September 2019

CCXXXIII. Untamed Beasts Painting Guide


The Heart-eater, final mini of the Untamed Beasts warband. As with the Iron Golems, I documented the painting process. Here's a step-by-step for you:


 UNTAMED BEASTS, START TO FINISH


1 - Zenithal priming: white over black. The recesses remain dark from the black spray, which gives me automatic shading in those hard to reach areas. The white provides a bright underlying surface for the glazes.


2 - Glaze of watered-down Rakarth Flesh (Citadel) over the enitre figure.


3 - Glaze of watered-down Zandri Dust (Citadel) over the enitre figure.


4 - Glaze of watered-down Russ Grey (Citadel) on the skin areas.


5 - Glaze of watered-down Dubai Brown (Scale75) on clothing, fur, weapon grips, helmet. Everything that's not skin or bone/horn.


6 - Glaze of watered-down Flat Black (Scale75) on the fur and helmet (not the helmet horns, though). I deliberately used the extra matt black for this.


7 - Glaze of watered-down Burnt Umber (Pebeo) on the leather belts and straps. I put the same glaze on the cape and loincloth, in uneven blotches.


8 - Agrax Earthshade and Nuln Oil washes (Citadel), slightly watered-down, on everything but the skin. More brown on lighter areas, more black on darker ones. Repeat where necessary.


9 - Highlight of sligthly thinned Rakarth Flesh on all bone and horn areas.


10 - Highlight of sligthly thinned Celestra Grey on all skin areas. Picking out the muscles, fingers and facial details.


11 - Another highlight on the skin, this time Celestra Grey (Citadel) mixed with a bit of Matt White (Pebeo).


12 - Highlight of Zandri Dust (Citadel) on select areas that were so far glazed with brown.
13 - Highlight of sligthly thinned Rakarth Flesh (Citadel) + Matt White (Pebeo) on bone and horn.


14 - The leather straps are a more reddish brown, so they were edge highlighted with a mix of Burnt Umber and Matt White (Pebeo).
15 - Watered-down Mephiston Red (Citadel) was added on certain areas as spot colour.
16 - The nipples were painted.
17 - The entire figure got a blacklining treatment. Slightly thinned Matt Black (Pebeo), applied with a precise brush where different parts/materials of the miniature meet. This step makes the mini clearer to read from a distance.
18 - The eyes were painted as white dots, for a particularly sinister look.
19 - The helmet and bit of chainmail on the loincloth were highlighted with Celestra Grey (Citadel) + Matt Black (Pebeo), and then Celestra Grey (Citadel).

The red spot colour was applied to the gaps between the weapons' teeth as a subtle wash. 


20 - Black and off-white splatter over the entire model. I do this because it adds so much to the atmosphere of a paintjob. I use an old #10 brush with stiff bristles for the task, flicking paint from it onto the mini. Depending on how thin the paint is, how loaded the brush and how far it is from the mini, the droplets will change in size, opacity and number. It's best you try for yourself to get a feel for it. Always check on a spare piece of paper before you go splatter the mini! If you make a mistake, you can still save it, but you only have seconds to wipe it off.

21 - The tattoos were done in freehand, using a #0 sable brush. The paint I used was a mix of Flat Black (Scale75) and Verdigris Blue (Secret Weapon). They're both rich in pigment, and will leave a neat line even when watered- down and made slightly transparent. The paint needs to be of such consistency to slide of the brush easily, but without running when it touches the mini. The brush needs to have a fine tip, but also enough body to hold a sufficient amount of paint to draw a few uninterrupted lines. I went with spiral patterns and dots, same designs I used on the entire warband. 

The final step was to base and spray-varnish the mini. My warband is now finished and ready to travel to its new home across the Atlantic.

Thursday, 12 September 2019

CCXXXII. Untamed Beasts

I'm nearly finished with the second warband from the Warcry starter set: the Untamed Beasts. I'm not really a fan of these models, they're overly cluttered and their weapons are huge and unwieldy (though I do like the idea of bone weapons, and some of them actually look good; if only they were smaller). As with the Iron Golems, I limited my converting interventions mostly to shaving off excessive details. Lots of spikes and fang trinkets were cut. The mini that needed most work was the Rocktusk Prowler, who got its horns and thigh chaos star removed (along with a few more minor changes).

I wanted a dark, drab colour scheme, with the addition of freehand tattoos to liven up the patches of pale bare skin.

There is one model left to do: the Heart-eater. Saved him for last with the intention of recording the painting steps as I work on him. Coming soon.

Preytakers

Rocktusk Prowler and Beastspeaker

Plains-runners

First Fang

Thursday, 29 August 2019

CCXXX. Iron Golems Painting Guide - Metal

Last week I showed how I painted skin on my Iron Golems for Warcry. In this post I'll cover the rest of the model, which is mostly metal armour.

IRON GOLEMS METAL


1 -The first step is Russ Grey (GW) + plenty of water, applied as a glaze over the entire armour and all the rest of the metal surfaces.


2 - next was Dark Wood (Secret Weapon), a medium grey colour. Applied over the parts that will be  'silver'.


3 - Brown Rust (Secret Weapon) glaze.

  
4 - a few more patchy glazes with different browns. You want to avoid too much of it getting on the 'silver parts'. Chainmail was an exception- there I deliberately added a bit of brown in places.


5 - Nuln Oil wash over all metal, for shading and definition.


6 - first highlight is with Celestra Grey (GW). This is only slightly thinned with water, as you don't want it to run and flood into the recesses and around details. I'ts mostly edge highlighting. Did it on both the brown and the silver parts with this.


7 - The second highlight is with white.


8 - Then, to add a bit of interest to the mostly drab, brownish model, I glazed some spots of the armour with thinned Secret Weapon Verdigris Pale Green. It subtly makes the model more 'alive'.


9 - the finishing touches. A bit of blacklining where necessary. And - you've probably noticed that in the past year or so I started applying tiny specks of paint on many of my models (mostly white and/or black). I do it because this splatter adds so much to the atmosphere of a paintjob. I use an old #10 brush with stiff bristles for the task, flicking paint from it onto the mini. Depending on how thin the paint is and how loaded the brush, the droplets will change in size, opacity and number. It's best you try for yourself to get a feel for it. Always check on a spare piece of paper before you go splatter the mini!

 *   *   *


That's all there is to it. The warband is now finished and ready to go to its new owner, and I'm getting started on the other starter warband: the Untamed Beasts.


Friday, 23 August 2019

CCXXIX. Iron Golems Painting Guide - Skin

I picked up the Warcry starter on preorder (mainly for the fantastic terrain and the new Furies). I'll probably try the rules at some point. My next project will be painting up the two warbands: Iron Golems and Untamed Beasts, who will both be going to their new owners once finished. 

Iron Golems are getting done first. I think these minis have a lot of potential. I made only minor changes on them for this project, but if I ever decide to do them again for my own collection, I will definitely change their weapons. I think they're the weakest part of the designs. 

Here's a step-by-step of how I'm doing the skin on the Iron Golems. I'll be doing the same for their armour next. 


IRON GOLEMS SKIN

 
1 - I start by applying black primer over the entire figure, followed by white primer at a downward angle. I find this great for painting with glazes and washes. The recesses remain dark from the black spray, which gives me automatic shading in those hard to reach areas. The white provides a bright underlying surface for the glazes.

2 - Since I'm going for quite a light skintone, the next step is to give the skin a couple coats of thinned white. I focus on the areas that are exposed, leaving the parts in the shadows darker.
 
3 - Thinned Zandri Dust is applied on the skin to provide a yellow tint and mild shading. I use plain water to thin the paints. Make it really thin. It's better to make it too thin and have to add another coat than mess up with one that's too heavy (this is not irreversible, mind you, but it wastes your time).

4
- Thinned Russ Grey tones down the yellow, and makes the shadows more prominent.

 
5 - At this point first highlights are added with slightly watered-down white. 

6 - A thin glaze of Zandri Dust helps even things out.

7
- The proces finishes with the final white highlight to pick out the detail - muscles, folds in skin, etc. In case this highlight is too stark, it can be toned down by lightly glazing it again. All these paint coats are very thin, so just adding more coats will not cause any problems.

Painted Armator and Ogre Breacher.